Monday, October 31, 2011

HAPPY HALLOWE'EN

I hope you have a very SPOOKY Hallowe'en today! I made these packages for gals who attended a Christmas Love card class on this past Saturday night.

The stamp set is Thriller and I cut the tags with Art Philosophy from retired Orange and Hydrangea cardstock. They were stamped in Black ink and I added sparkles and some satin ribbon.

What is inside the bags you say......well, I found this post on Tatertots and Jello for Candy Corn fudge. I am not a big fan of candy corn, because it always seems to not taste fresh from the stores. So, making my own candy corn that tasted like fudge was a no brainer.

The recipe was also a no brainer.....6 cups of white chocolate chips and 2 cans of condensed milk. Here is a link to the recipe from Something Swanky. Both of these sites have some wonderful things to oogle!

Now, I know you're saying...."Why is her candy corn not orange and yellow?" Well, I added what I thought was enough food colouring, but clearly it was not enough! The colours may not have been very vibrant, but it tasted fudgelicious!

All supplies are Close to My Heart, unless noted.
Stamp: Thriller
Ink: Black
Cardstock: Retired Orange and Hydrangea
Embellishments: Sparkles
Tools: Art Philosophy
Other: Hallowe'en plastic bags

Sunday, October 30, 2011

Fall glory with Remarkable Wreath

This is my ode to Fall.....I LOVE Fall. I love the temperature outside; I love the colours; I love how dark it is so early in the evening; and I love the rain!

I started this card with a Barn Red base then added patterned paper from Elemental. The Kraft and Goldrush cardstock pieces were stamped with an image from Spot On Backgrounds.

The wreath was stamped in Cocoa, the the leaves were inked in Goldrush and rolled in Autumn Terracotta. I added Bronze Glitz along with Twill ribbon; hemp; and an Antiqued Copper brad.

All supplies are Close To My Heart.
Stamps: Remarkable Wreath; Spot On Backgrounds
Paper: Elemental
Cardstock: Barn Red; Kraft; Goldrush; Colonial White
Ink: Desert Sand; Cocoa; Goldrush; Autumn Terracotta
Embellishments: Antiqued Copper brad; hemp; twill ribbon; Bronze Glitz
Tools: Art Philosophy Cricut cartridge


Saturday, October 29, 2011

Sonoma and Remarkable Wreath

This is my non-Christmas card. I shamelessly stole the idea and colours from fellow HAS swap card member, Lorrinda Holman.

I created two of everything with Remarkable Wreath, and this card was no exception. I stamped the flowers in both Petal and Smokey Plum inks. What you can't see is I have used our Silver Glitz in the centres of some of the flowers.

I stamped our Canvas Badge Buttons with a butterfly image from Gnome Garden. The image stamped behind the button is from Dreamin' Workshop On The Go.

I used Sonoma paper and Kraft borders. All edges were inked with Desert Sand.


All supplies are Close To My Heart.
Paper: Sonoma
Stamps: Remarkable Wreath; Gnome Garden; Dreamin' WOTG
Cardstock: Petal;Smokey Plum; Garden Green; Colonial White
Ink: Petal; Smokey Plum; Desert Sand; Cocoa
Embellishments: Canvas Badge Buttons; Kraft Borders; Silver Glitz
Tools: Art Philosophy Cricut cartridge


Friday, October 28, 2011

Love Life and Remarkable Wreath for Christmas!

Another fine use, just a little different, for my Remarkable Wreath stamp set.

For this card, I stamped the leaves in green over the Cocoa wreath, then the berries in red. I wanted it to somewhat resemble holly. I stamped the flourish image from Love Life in Sweet Leaf ink on Sweet Leaf cardstock.

I LOVE our Kraft cardstock and borders, so you can see the base layer of the card; scallop circle mat and borders are all in Kraft paper. I added some patterned paper from Believe and White Daisy grosgrain ribbon. Finally, I had to add some red Glitz to the berries to finish off this card.

All supplies are Close To My Heart.
Stamps: Remarkable Wreath; Love Life
Paper: Believe
Cardstock: Kraft; Colonial White
Ink: Sweet Leaf; Holiday Red; Desert Sand; Cocoa
Embellishments: White Daisy Grosgrain ribbon; red Glitz
Tools: Art Philosophy Cricut cartridge


Thursday, October 27, 2011

Remarkable Wreath and Believe

This version of Close To My Heart's, Remarkable Wreath, has got the Christmas holidays all over it.

I used patterned paper from Believe on a White Daisy card base. The wreath is stamped in Cocoa ink and the berries are stamped in Holiday Red, four times. The berry image is a semi-circle, so you must stamp it twice to cover the wreath. After I stamped the berry wreath once, I turned the paper a 1/4 turn and then stamped the berry wreath again, for a fuller image.

The sentiment is stamped in Cocoa ink from the set, Glory to God. I added Red Glitz to some of the berries. I sponged Desert Sand ink on all paper edges and added 3 White Daisy brads, at the bottom.

All supplies are Close To My Heart.
Paper: Believe
Stamp: Remarkable Wreath; Glory to God
Ink: Desert Sand; Holiday Red; Cocoa
Cardstock: Kraft; White Daisy; Sky
Embellishments: White Daisy brads
Tools: Art Philosophy Cricut cartridge


Wednesday, October 26, 2011

Remarkable Wreath Extravaganza!

For the next several days, I will be posting cards I have recently made with this AMAZING and VERSATILE stamp set.........Remarkable Wreath. You can purchase it, Remarkable Wreath C1473 for $15.50, from my website OR attend my upcoming classes on Saturday, Dec 3rd or Sunday, Dec 4th. We will be making versions of the upcoming cards. Please email me for my class descriptions.

This card began as an experiment......in what would work with White Daisy pigment ink. I stamped the wreath image in Cocoa ink on Barn Red cardstock. Then I stamped the berry image and sentiment with White Daisy. I find when you are stamping with this pigment ink on dark coloured cardstock, you have to wait a bit for the ink to dry so you can really see what it will look like. You could use your heat gun to speed up the process, but I just let it sit and the ink became much brighter with time.

The patterned paper is from Mischeif, as well as, the border image. The border is the zip strip, which is new to Close To My Heart's paper. It is patterned on one side and on the reverse is the paper kit's name and colours it is comprised of.

I cut the bracket shape with my CTMH Art Philosophy cartridge. The lighter mat is cut at 1/4 inch larger. I added White Daisy ric rac ribbon and some Bitty Sparkles. I also used a sponge to ink some piece edges with Desert Sand ink.

All supplies are Close To My Heart, unless noted.
Stamp: Remarkable Wreath
Paper: Mischief
Ink: White Daisy pigment; Cocoa; Desert Sand
Cardstock: Barn Red; White Daisy; Grey Flannel; Smoothie
Embellishments: Bitty Sparkles; White Daisy ric rac ribbon
Tools: Art Philosophy Cricut cartridge


Tuesday, October 25, 2011

Dreamin' for a workshop

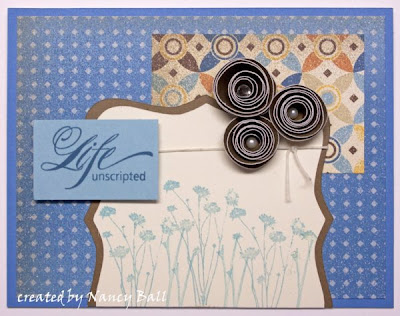
This is the final card in my recent Variety card class. It started with Dreamin' paper and some cuts from Close To My Heart's Art Philosophy cartridge.

The stamped images are from the stamp set, Unscripted. The sentiment is stamped on Crystal Blue cardstock with Pacifica ink. The tiny flowers are stamped with Crystal Blue ink on Colonial White cardstock.

The bracket shapes and flowers are all Art Philosophy cuts. The flowers, which are the lollipop or circular ones, were cut at sizes between 1 3/4" and 2 1/4". The bracket shape was cut at 3 1/4" in Colonial White and 3 1/2" in Chocolate.

I used White Daisy waxy flax to add the tie and Opaques and Sparkles in the centres of each flower.

All supplies are Close To My Heart, unless noted.
Paper: Dreamin'
Stamp: Unscripted
Cardstock: Dutch Blue; Chocolate; Colonial White; Crystal Blue
Ink: Crystal Blue; Pacifica
Embellishments: White Daisy Waxy Flax; Opaques; Sparkles
Tools: Art Philosophy Cricut cartridge; Cricut


Monday, October 24, 2011

Remarkable Wreath

This card was lifted from Vicki Wizniuk.......she creates amazing artwork and I just couldn't resist. You can check out her card by clicking on her name, for a link to her blog.

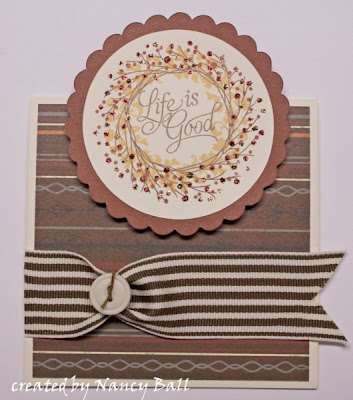
I have come to the conclusion that stamp set, Remarkable Wreath, is one of the most versatile stamp sets yet. For this card I stamped the wreath in Cocoa ink; leaves in Creme Brulee; then berries in Cranberry. The scalloped mat is Barn Red and it is paired with patterned paper from Mischief. We added Red Glitz to some of the berries.

The circle and scallop shape were cut with Art Philosophy. We added our new, glorious Chocolate striped ribbon with a Colonial White button and Chocolate Waxy Flax. Pretty clean and simple, with a gorgeous outcome.

All supplies are Close To My Heart.
Stamps: Remarkable Wreath
Paper: Mischief
Cardstock: Barn Red; Colonial White
Ink: Creme Brulee; Cocoa; Cranberry
Embellishments: Chocolate ribbon; Colonial White button; Chocolate Waxy Flax
Tools: Art Philosophy Cricut cartridge


Sunday, October 23, 2011

Mrs. Claus is fashionable!

This is another card recently created for my Variety Card class. I used a technique previously lifted and used from Mandy Leahy. You can check out her instructions of how to make these dresses on her blog, by clicking on her name.

We used "Believe" patterned paper and the zip strip on the end, also. The dress was cut at 3" and scored across every space, leaving one open half way, to be cut for the top of the dress. We folded the skirt up, then flattened it out and added Liquid Applique. This is the best "snow" for paper crafts....it is just amazing stuff.

The dress form is from Tailor-Made and the sentiment is from Christmas Love. We used some retired Topiary embellishments and my trusty corner/scallop maker for the border. We also used a Topiary marker to adjust the words on the zip strip to read Mrs. Claus.

All supplies are Close to My Heart.
Stamps: Christmas Love; Tailor-Made
Paper: Believe
Cardstock: White Daisy; Topiary; Sweet Leaf
Ink: Topiary
Embellishments: retired Topiary buttons
Tools: Art Philosophy; corner/scallop maker


Saturday, October 22, 2011

Typeset craziness

I recently held a Variety card class and this is one of the cards each gal made. As much as I love Typset paper, I seem to go a bit crazy whenever I use it.

I cut star and bracket shapes on with my Art Philosophy cartridge in Desert Sand, then put them through my dollar store crimper. I also cut the cut ticket shapes. These were stamped with one coordinating AP stamp set and an image from Blue Ribbon.

We stuck the tickets in our new Pin Clips, then added coordinating buttons. Our corner rounder/scallop maker was used to make the border.

All supplies are Close To My Heart.
Stamps: Blue Ribbon; AP bundle set
Paper: Typeset
Cardstock: Vineyard Berry; Colonial White; Juniper; Desert Sand
Ink: Juniper; Vineyard Berry
Other: Pin Clips; Buttons
Tools: Art Philosophy; Corner/Scallop Maker


Friday, October 21, 2011

An Elemental Birthday

Hah, rather than an Elemental Birthday.....it could have been a temper mental birthday for my husband!I put this card together, quickly, when I realized it was past midnight and already my husband's birthday. This wouldn't matter to most, however, my husband arrives home from work at 12:30am, so there didn't seem to be any excuses for me to not have a card ready!

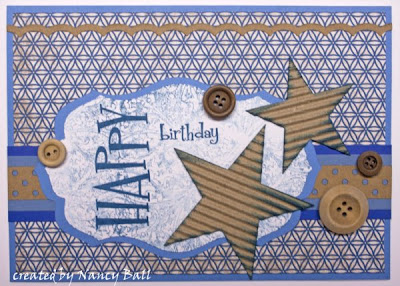
This was a very simple card using Elemental paper in the background on a Dutch Blue background. I stamped the Art Philosophy shape with the background image from Happy Journey. I inked up some Milepost stars and added two Kraft border strips. The card was finished off with wooden buttons and some mushy, words of love on the inside!

All supplies are Close to My Heart.
Paper: Elemental
Stamp: Happy Journey; A Little Everything
Cardstock: Dutch Blue; White Daisy; Pacifica; Indian Corn Blue
Ink: Dutch Blue; Pacifica
Embellishments: Wooden Buttons; Kraft Borders; Milepost shapes


Friday, October 7, 2011

Believe in pointsettias

I have discovered a new use for a flower image on my Close To My Heart Art Philosophy cartridge.....poinsettias.

I started with one of our new card boxes and covered it with patterned paper from, Believe. I added some of our new gingham ribbon from the Red assortment.

Then I set out to decorate with a poinsettia.....which I love because of there colours and joyfullness. This image is the second to last image on the second row of buttons...flower7. I cut 4 different sizes: 3 3/4; 3 1/4; 2 3/4; and 2 1/4. Then I used my stylus and drew leaf spines the backside of each petal. Then I turned the flower over and bent each petal on the centre line.

After bending each petal on the centre line, I used our sanding block to expose the other spine lines I had drawn on the back side. I used a sponge to apply Topiary ink to the edges and lightly on the spine marks. I used our glue pen to draw a thin bead of glue on each petal edge. Once it was tacky I rubbed our Prisma glitter on for the bling.


Here is what the front of my box looks like decorated.

For the berry like middle of the poinsettias, I simply tor a 1/4" piece of cardstock in white, then soaked the edge in Topiary ink. I applied glue pen to the top and added Prisma glitter once tacky. I put a small pool of Liquid Glass in the middle of the stuck together flowers, then held the berries in place until the LG was set.

Here is a second pointsettia in Holiday Red. I also slightly bent each petal towards the middle, just by pressing my thumb nail in between each towards the middle of the petals.


All supplies are Close To My Heart.
Paper: Believe
Tools: Art Philosophy; stylus
Cardstock: White Daisy; Holiday Red
Ink: topiary
Other: Liquid Glass; Prisma Glitter; Glue pen; Red ribbon Assortment; Card Box


Thursday, October 6, 2011

More spooky Hallowe'en......

While at Close To My Heart's annual convention, I was able to take advantage of ordering new product that was bundled up with other new goodies. One stamp set I received was, Backdrop-Charmed.

This stamp set has Hallowe'en and Fall backdrop style frames and a few sentiments. I stamped the Hallowe'en image on Mischief patterned cardstock. I overstamped it in Versamark and embossed in clear embossing powder.

I cut out an image from another patterned piece of paper in the Mischief kit, for the circle embellishment. The sentiment is from Mischief Workshop On The Go. I also stamped the entire Barn Red cardstock mat in the web flourish image from the same stamp set.

Finally, I added the crow/raven from our new Midnight Felt Shapes. Once it was stuck down, I covered it in our Stardust Glitz for a bit of bling on the card.

All supplies are Close To My Heart, unless noted.
Stamps: Backdrop-Charmed; Mischief WOTG
Paper: Mischief
Cardstock: Colonial White; Barn Red; Sunset; Black
Ink: Black; Versamark
Embellishments: Midnight Felt Shapes; Black brad


Wednesday, October 5, 2011

Spiders...'n Crows....'n webs oh my!

Hallowe'en is less than a month away........I've made a few more cards for the occasion! This card started with Close To My Heart's new stamp set, All Hallows Eve.

I first cut the main shape with my Art Philosophy cartridge. I used the web image and stamped enough times in black ink, to cover the entire shape. Then I stamped the crow image in black and embossed in clear over top.

I have been very selectively cutting this piece of patterned paper from my Mischief package. It has several great scenes on it and I figured I should use it for several cards. I picked out the creepyish flourish border to creatively look like a spider's silk, that he comes repelling from outta nowhere. You know what I mean.....one minute there is nothing there and the next thing you know you've got a spider's silk and likely the spider too.....on you............eeeeeeeeeeeeeeeeeeeek!

I stamped in black, then embossed in clear the little spindly legged creeper. Seems, most every image I stamped, I followed the same technique. The sentiment is from the Mischief Workshop On The Go kit and the border from Aug stamp of the month, Wicked.

Finally, I added Barn Red cardstock and Mischief patterned as a mat for the crow. I also added Black Opaques.

All supplies are Close To My Heart, unless noted.
Stamps: All Hallows Eve; Mischief WOTG; Wicked
Paper: Mischief
Ink: Black; Versamark
Cardstock: Colonial White; Barn Red; Black; Sunset
Embellishments: Black Opaques; Colonial White brad; Clear embossing powder
Tools: Art Philosophy cartridge
Other: Fiskars Admit One punch


Monday, October 3, 2011

Blogtoberfest Challenge

Fellow consultant extraordinaire, Tresa Black has posted a Blogtoberfest challenge on her blog. It is a time to "step up their game" in everything that is bloggy. So, I am going to take challenge and I hope you enjoy my stepping up! Please click on this icon to the right to take you to a list of blogs who have also accepted Tresa's challenge!